Splitting The Cake
Once the cake has cooled all the way through, you will need to level its domed top.
Once the cake has cooled all the way through, you will need to level its domed top.
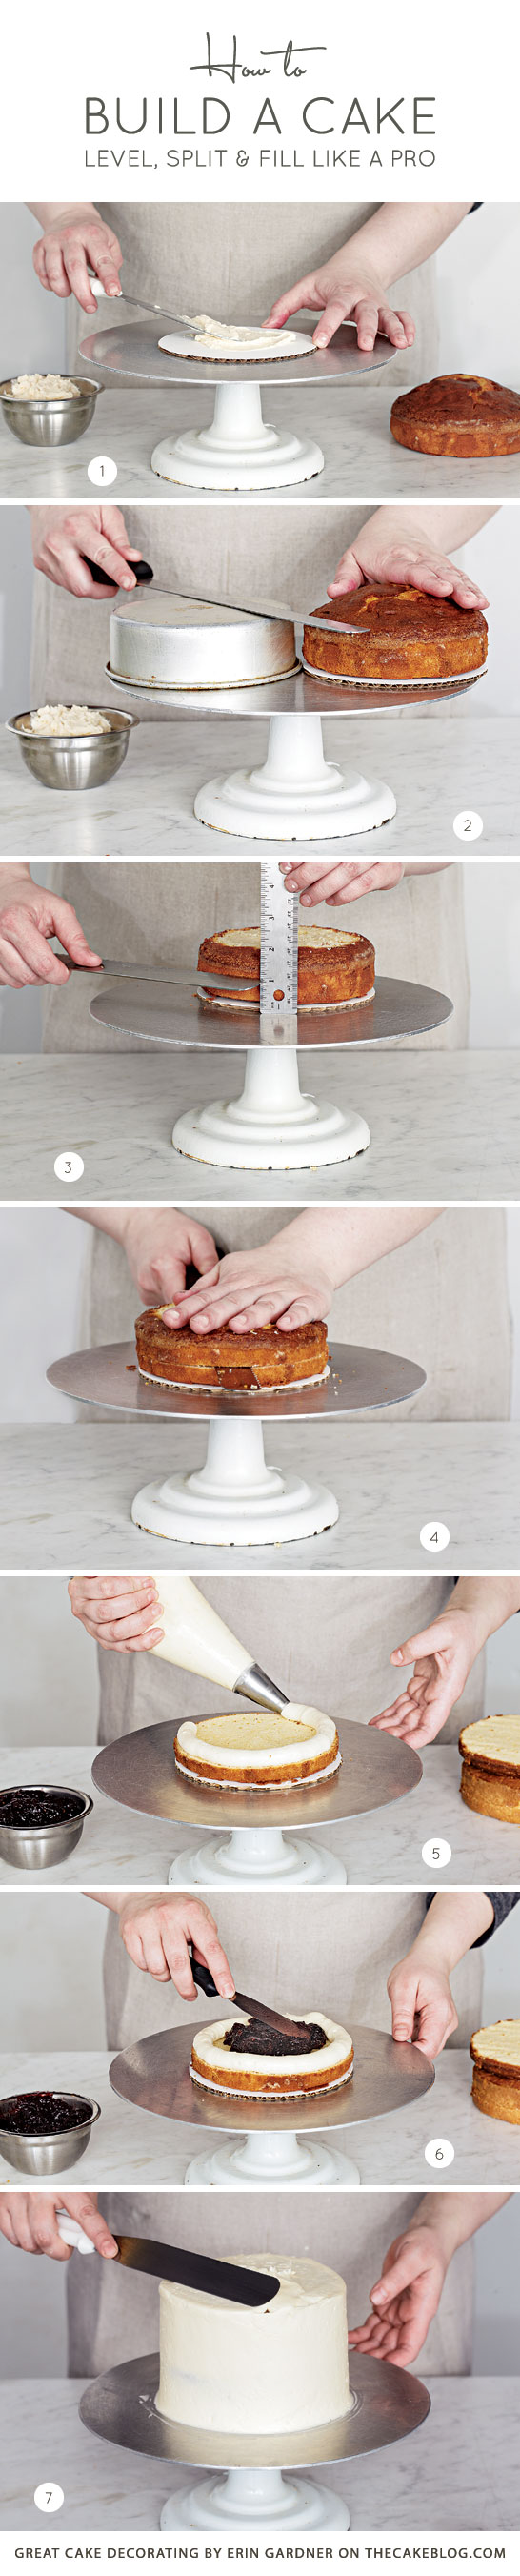
STEP 1 : Apply a small smear of buttercream (about the size of a half dollar for a regular-sized cake, more for larger cakes) to a cake board that’s the same diameter as the cake round. This ensures that the cake will stick when placed on the board.
STEP 2 : Place the cake on the board. Turn the pan that the cake was baked in upside down, and place it near the baked cake. Use the pan as your guide and run a serrated knife across the top of the cake to cut it level.
STEP 3 : Once the cake is leveled, use a metal ruler to find the center point around the outside of the cake, and mark it by lightly scoring the cake with a knife. Set the ruler aside.
STEP 4 : With the knife in one hand and your other hand flat on top of the cake to keep it steady, use a smooth sawing motion to slowly cut around the cake from the outside edges toward the center until the knife is all the way through.
Filling The Cake
No matter how many layers your cake will be, you always want the filling layers to be about half as high as your cake layers. I typically do four layers of cake with three layers of filling to achieve tall, beautiful slices. Take time to fill and chill the cake properly in order to avoid what I call the cake “muffin top.” That’s when the layers of filling haven’t been done properly or the filling is too soft for the weight of the cake, causing the cake to get those unsightly little bulges between each layer.
If you’re filling the cake with a buttercream frosting only, spread or pipe the buttercream (using a large round decorating tip size #789 or similar) on top of the first cake layer and stop 1/4 inch away from the edge.
When you place the next round of cake on top, press down starting from the center and moving out towards the edges – this forces the buttercream to fill in the space without going over the edge. Repeat with each cake layer until all the layers have been stacked. Use the level to check that the top and sides of your cake are straight.
How To Use a Softer Filling
STEP 5 : If adding a softer filling like jam or cream cheese frosting, pipe a dam around the top outer edge of the cake round with a firm-setting buttercream.
STEP 6: Fill the center with the filling, and top it with the next cake round. Place the cake in the fridge, and allow it to set completely, at least 2 hours but up to overnight, before finishing.
STEP 7: Frost as desired.
TIP : Save That Cake Top!
If you don’t immediately give in to the temptation of snacking on the little domed piece of cake you just cut off, you can use it to create “sand” or “dirt” for your next cake design. Dry the cake scraps in an oven on low heat (about 250 degrees for 20-30 minutes). When the cake dome has cooled, run it through a food processor with a few pulses. Store the cake sand in an airtight container (it should last for about a month).
No comments:
Post a Comment