Wednesday, July 30, 2014

新老手必看——打发大全(淡奶油、奶油、蛋白、全蛋)


很多新手对各种材料的打发比较迷惑,先说说鲜奶油打发的吧

鮮奶油打發 (wipping cream) 
鮮奶油是用來裝飾蛋糕與製作慕斯類甜點中不可缺少的材料,由牛奶提煉而成的濃稠鮮奶油,包含高達27~38%不等的脂肪含量,攪打時可以包入大量空氣而使體積膨脹至原來的數倍,打發至不同的軟硬度,也具有不同的用途。 


1.墊冰塊: 
在容器底部墊冰塊的目的,是為了使鮮奶油保持低溫狀態以幫助打發,尤其在炎熱的夏季,再者攪打時會因摩擦產生熱能,所以必須利用冰塊來降溫,以免鮮奶油因熱融化而造成無法打發的狀況產生,冬季時則可省略。


2.六分發: 
當手持攪拌器順同一方向拌打數分鐘後,鮮奶油會膨發至原體積的 倍,而且鬆發成為具濃厚流質感的黏稠删,此即所謂的六分發,適合用來製作慕斯、冰淇淋等甜點。 


3.九分發: 
如果是手動操作打發鮮奶油,要打至九分發需要極大的手勁及耐力,因為鮮奶油會愈來愈濃稠質硬而難打,體積也愈大,最後會完全成為固體狀,若用刮刀刮取鮮奶油,完全不會流動,此即所謂的九分發,只適合用來製作裝飾擠花。

蛋白的打发 
窍门: 
选新鲜鸡蛋的蛋清,不能沾水、蛋黄和油,冬天用40度左右温水垫在打蛋盆下,打前滴几滴白醋,放糖时放1ml玉米淀粉,最好每个蛋清配20克糖,很容易打发。 

那种蛋白特别粘稠的鸡蛋是不太新鲜的了,新鲜的鸡蛋蛋白很稀。不新鲜的鸡蛋很难打发的。 

夏天要把蛋白的温度保持在23度左右,如果温度太高,要放冰箱冷藏几分钟,再打。 


要製作出成功又好吃的蛋糕,除了材料比例要正確,蛋白打發是極為重要的關鍵之一,對於初學者而言,通常只要能打出漂亮的蛋白,這也代表離成功不遠,以下就是蛋白打發的三大關鍵: 

打蛋器Whisk/Whipper 
攪拌打發或拌勻材料,最常用的有瓜型(直型)、螺旋型及電動打蛋器。瓜型打蛋器用途最廣,可打蛋、拌勻材料及打發奶油、鮮奶油等,鋼圈數愈多愈易打發;螺旋型打蛋器則適合於打蛋及鮮奶油;電動打蛋器最為省時省力。 


1.加入砂糖 
首先蛋白要置於乾淨無油無水的圓底容器中,利用打蛋器順同一方向攪打,至出現大泡沫時,就可以將砂糖分次加入蛋白中,此時加入砂糖可幫助蛋白起泡打入空氣,增加蛋白泡沫的體積。 


2.濕性發泡 
蛋白一直攪打,細小泡沫會愈來愈多,直到整個成為如同鮮奶油般的雪白泡沫,此時將打蛋器舉起,蛋白泡沫仍會自打蛋器滴垂下來,此階段稱為「濕性發泡」,適合用於製作天使蛋糕。 


3.乾性發泡(或稱硬性發泡) 
濕性發泡再繼續打發,至打蛋器舉起後蛋白泡沫不會滴下的程度,為「乾性發泡」,或稱「硬性發泡」,此階段的蛋白糊適合用來製作戚風蛋糕,或者是檸檬派上的裝飾蛋白。 

蛋白打發的原理 

不知道是不是有人跟我一樣,好奇這清清如水的蛋白,在經過打蛋器的攪打後,居然會變成白白細細的泡沬,而這些白細的泡沫竟然可以在西點蛋糕中扮演一個重要的角色。 

蛋白中主要的二種蛋白質,一是球蛋白,它的功用是減少表面張力,同時增加蛋白的黏稠度,隨著機械作用將空氣攪打入蛋白產生泡沫從而增加表面積;一是黏液蛋白,它的功用是使形成泡沫的表面變性,凝固而形成薄膜使打入的空氣不致外洩。如此麵糊進入烤箱後,蛋白裡的空氣因受熱而膨脹。如果買來的蛋不新鮮的話,蛋白較稀、黏度較低,自然不容易起泡成形。 

攪打後的蛋白,隨著顏色從透明轉而變白,同時泡沫的體積增加、硬度也增加,但攪打至某一程度時,泡沫薄膜的彈性就開始減小,蛋白變得較脆,烤出來的蛋糕沒有彈性,口感也較韌。打過頭的蛋白呈棉花球狀,乾燥不易與其他材料混合。 

打成白色泡沫狀的蛋白,一旦持續性的攪打動作停止,在一段極短時間之後,如果再重新攪打的動作,此時蛋白變性(性質及狀態的改變)的動作即不再繼續,不斷的攪打反而會將泡沫薄膜打破,使蛋白消泡。所以,打發的蛋白要立即使用,不能在放置一段時間之後,又欲將消泡的蛋白繼續打至發泡的狀態。 

如果攪打蛋白時,器具上有油或水,或是蛋白中含有蛋黃(蛋黃中有油脂成分),會使得攪打時,蛋白液完全無法依附在器具上而跟著攪拌頭不停的旋轉,就像是用手在水中快速劃圈,水會跟著撩撥產生的圓旋轉一樣,怎麼攪打都無法使空氣打入,使變性作用開始運作,在油、水含量愈多時,情況就會愈明顯。 

砂糖與蛋白的攪打 

攪打蛋白時加入砂糖可以幫助蛋白蛋打發。蛋白的表面張力愈小愈容易打發,但氣泡較粗大,容易破壞。砂糖的加入能和蛋白中的水分一起融化成糖液,使蛋白的表面張大變大,打出的氣泡較細、較穩定。加入砂糖的時機會影響打發蛋白霜的品質,先加糖再打發與先打發再加糖兩者的打發狀態會有不同。配方中的糖若減少,應早點加入攪打以免氣泡消泡。《烘焙工業 103 期》 

蛋黃內含的油脂會妨礙蛋白的起泡,分蛋的打法可以使蛋糕的體積更大更鬆軟 

打發的蛋白要立即使用,不可靜置數分鐘後再行攪拌或繼續打發,久置後蛋白非常脆弱,容易在攪拌過程中消泡。 

打蛋白時所有的器具要保持乾淨,沒有水分及油污(沒有洗淨的奶油薄薄的附在盆壁也會影響),儘量不要把蛋黃弄破泡到蛋白中 

蛋白的溫度在 17C 至 22C 之間最易打發 

塔塔粉可幫助蛋白的打發 

先將蛋白用中速打至粗泡後,再加入砂糖(一般說來,糖份量為蛋白重量的2/3)攪拌至需要的程度(濕性發泡或硬性發泡)。使用高速攪拌的話,蛋白來不及與空氣拌合即被打出,而且球蛋白和黏蛋白因高速作用而提早凝固,易失去彈性。 

加入糖的蛋白比不加糖的容易打發。

全蛋的打发 
全蛋因為含有蛋黃的油脂成分,會阻礙蛋白打發,但因為蛋黃除了油脂還含有卵磷脂及膽固醇等乳化劑,在蛋黃與蛋白為1:2比例時,蛋黃的乳化作用增加,並很容易與蛋白與包入的空氣形成黏稠的乳狀泡沫,所以仍舊可以打發出細緻的泡沫,是海綿蛋糕的主要作法之一。 


1.拌勻加溫 
全蛋打發時因為蛋黃含有油脂,所以在速度上不如蛋白打發迅速,若是在打發之前先將蛋液稍微加溫至38~43℃,即可減低蛋黃的稠度,並加速蛋的起泡性。此時要將細砂糖與全蛋混合拌勻,再置於爐火上加溫,加熱時必須不斷以打蛋器攪拌,以防材料受熱不均。 


2.泡沫細緻 
開始用打蛋器不斷快速拌打至蛋液開始泛白,泡沫開始由粗大變得細緻,而且蛋删積也變大,以打蛋器撈起泡沫,泡沫仍會滴流而下。 


3.打發完成 
慢速再攪打片刻之後,泡沫顏色將呈現泛白乳黃色,且泡沫亦達到均勻細緻、光滑穩定的狀態,以打蛋器或橡皮刮刀撈起,泡沫稠度較大而緩緩流下,此時即表示打發完成,可以準備加入過篩麵粉及其他材料拌勻成麵糊。

奶油的打发(这种奶油,就是平时咱们在超市买到的“黄油”) 

奶油的熔點大約在30℃左右,視製作時的不同需求,則有軟化奶油或將奶油完全熔化兩種不同的處理方法。如麵糊類蛋糕就必須藉由奶油打發拌入空氣來軟化蛋糕的口感以及膨脹體積;製作餡料時,則大部份都要將奶油熔化,再加入材料中拌勻。 


1.奶油回溫: 
奶油冷藏或冷凍後,質地都會變硬,退冰軟化的方法,就是取出置放於室溫下待其軟化,至於需要多久時間則不一定,視奶油先前是冷藏或冷凍、份量多寡以及當時的氣溫而定,奶油只要軟化至用手指稍使力按壓,可以輕易被手壓出凹陷的程度就可以了。 


2.與糖調勻: 
用打蛋器將奶油打發至體積膨大顏色泛白如圖所示,再將糖粉與鹽都加入奶油中,繼續以打蛋器拌勻至糖粉完全融化,麵糊質地光滑。 


3.打發完成: 
完成後的麵糊應成光滑細緻狀,顏色呈淡黃,已以打蛋器將之舉起奶油麵糊不會滴下得程度,就算完成了,這一款的麵糊最成應用於重奶油蛋糕的製作上,加入不同的香料與餡料調配即變成不同口味的澎鬆蛋糕歐。 
制作蛋糕时容易出现的问题及解决方法 

1、在夏天或冬天都会出现蛋糕面糊搅打不起的现象。 
原 因: 
因为蛋清在17—22℃的情况下,其胶粘性维持在最佳状态,起泡性能最好,温度太高或太地均不利于蛋清的起泡。温度过高,蛋清变得稀薄,胶粘性减弱,无法保留打入的空气;如果温度过低,蛋清的胶粘性过浓,在搅拌时不易拌入空气。所以会出现浆料的搅打不起。 

解决办法: 
夏天可先将鸡蛋放入冰箱冷藏至合适温度,而冬天则要在搅拌面糊时一边在缸底加温水升温,以便达到合适的温度。 

2、有时蛋糕在烘烤的过程中出现下陷和底部结块现象。 
原 因: 
1)、冬天相对容易出现,因为气温低,部分材料不易溶解; 
2)、配方不平衡,面粉比例少,水分太少,总水量不足; 
3)、鸡蛋不新鲜,搅拌过度,充入空气太多; 
3)、面糊中柔性材料太多,如糖和油的用量太多; 
4)、面粉筋都太低,或烤时炉温太低; 
5)、蛋糕在烘烤中尚未定型,因受震动而下陷。 

解决办法: 
1)、尽量使室温和材料温度达到合适度; 
2)、配方要平衡和掌握好; 
3)、鸡蛋保持新鲜,再搅拌时注意别打过度; 
4)、不要用太低筋的面粉,特别是掺淀的时候注意; 
5)、蛋糕在进炉后的前12分钟不要开炉门和受到震动。 

3、蛋糕膨胀体积不够 

原 因: 
1)、鸡蛋不新鲜,配方不平衡,柔性材料太多; 
2)、搅拌时间不足,浆料未打起,面糊比重太大; 
3)、加油的时候搅拌的太久,使面糊内空气损失太多; 
4)、面粉筋力过高,或慢速拌粉时间太长; 
5)、搅拌过度,面糊稳定性和保气性下降; 
6)、面糊装盘数量太少,未按规定比例装盘; 
7)、进炉时炉温太高,上火过大,使表面定性太早。 

解决办法: 
1)、尽量使用新鲜鸡蛋,注意配方平衡; 
2)、搅拌要充分,使面糊达到起发标准; 
3)、注意加油时不要一下倒入,拌匀为止; 
4)、如面粉筋里太高可适当加入淀粉搭配; 
5)、打发为止,不要长时间的搅拌; 
6)、装盘份量不可太少,要按标准; 
7)、进炉炉温要避免太高。 

4、蛋糕表面出现斑点 
原 因: 
1)、搅拌不当,部分原料未能完全搅拌溶解和均匀; 
2)、泡打粉未拌匀,糖的颗粒太大; 
3)、面糊内总水分不足; 

解决办法: 
1)、快速搅拌之前一定要将糖等材料完全拌溶解; 
2)、泡打粉一定要与面粉一起过筛,糖尽量不要用太粗的; 
3)、注意加水量。 


5、海绵类蛋糕表表皮太厚。 
原 因: 
1)、配方不平衡,糖的使用量太大; 
2)、进炉时面火过大,表皮过早定型; 
3)、炉温太低,烤的时间太长。 

解决办法: 
1)、配方中糖的使用量要适当; 
2)、注意炉温,避免进炉时上火太高; 
3)、炉温不要太低,避免烤制时间太长。 

6、蛋糕内部组织粗糙,质地不均匀。 
原 因: 
1)、搅拌不当,有部分原料未拌溶解,发粉与面粉未拌匀; 
2)、配方内柔性材料太多,水分不足,面糊太干; 
3)、炉温太低,糖的颗粒太粗。 

解决办法: 
1)、注意搅拌程序和规则,原料要充分拌匀; 
2)、配方中的糖和油不要太多,注意面糊的稀绸度; 
3)、糖要充分溶解,烤时炉温不要太低。

Wednesday, July 16, 2014

蛋白霜打發方式

蛋白霜打發方式


蛋白的發泡能力非常強,經由打蛋器快速攪拌將空氣打入
蛋白中,使得蛋白霜中怖滿無數細小充滿空氣的孔隙.利用
這樣的方式做出來的蛋糕就會非常蓬鬆柔軟.

實際操作請參考 : 蛋白霜打發影片


準備工作:

1.雞蛋從冰箱取出,細砂糖及檸檬汁秤量好
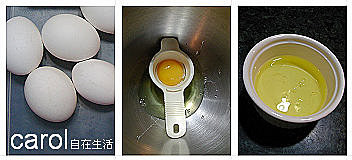
2.將雞蛋的蛋白及蛋黃小心分開,蛋白決不可以沾到蛋黃,水份及油脂
   (分雞蛋的時候都先分在一個小碗中,確定沒有沾到蛋黃才放入
    鋼盆中,不然只要一顆沾到蛋黃,全部的蛋白就打不起來了)


A.手拿式電動打蛋器操作:


蛋白霜濕性發泡打發:
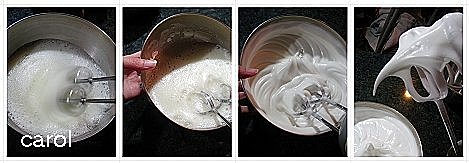
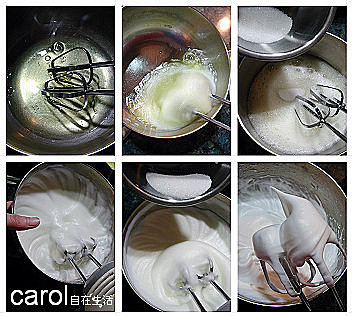
1.蛋白用打蛋器先打出泡沫,然後加入1/2量細砂糖及檸檬汁用高速攪打
2.用一隻手扶著鋼盆慢慢旋轉,另一隻手拿打蛋器固定不動的方式來攪打
3.泡沫開始變較多時就將剩下的細砂糖加入,速度保持高速.將蛋白打到拿
   起打蛋器尾巴呈現彎曲的狀態即可
   *打至濕性發泡約需要4-5分鐘 


蛋白霜乾性發泡打發:
1.讓鋼盆傾斜一邊,蛋白才會流到一側,攪打的時候才會均勻
2.蛋白用打蛋器先打出泡沫,然後加入檸檬汁及1/2量細砂糖用高速攪打
3.用一隻手扶著鋼盆慢慢旋轉,另一隻手拿打蛋器固定不動的方式來攪打
4.泡沫開始變細緻時就將剩下的細砂糖加入,速度保持為高速.將蛋白打到
   拿起打蛋器尾巴呈現挺立的狀態即可
    *打至乾性發泡約需要8-10分鐘


B.家用攪拌機操作:

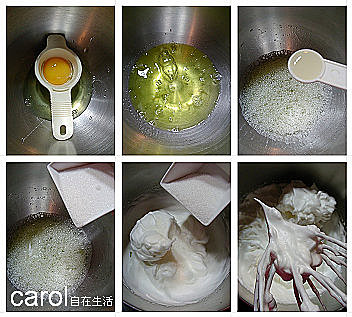
1.雞蛋將蛋黃蛋白分開(蛋白不可以沾到蛋黃,水份及油脂)
2.先用中速度打出一些泡泡
3.然後停下來加入檸檬汁及1/2量砂糖
4.用速度8(高速)攪打到泡沫開始變細緻並且膨脹
5.再把剩下的砂糖加入用速度8(高速)打到非常有光澤尾端挺立的狀態
   (全程約8-10分鐘可以完成)


 影片請參考 : KA攪拌機打發法式蛋白霜全程影片

補充:
打蛋白霜一定要使用細砂糖,不可以使用二砂.
二砂顆粒太粗無法融化,打出來的蛋白霜會不
夠堅固,一攪拌很容易消泡造成成品失敗.


註:

1.
蛋白是鹼性的物質,加一點檸檬汁可以中和蛋白中的
鹼性,調整蛋白韌性,使得打發的蛋白泡沫更穩定.沒
有檸檬汁用白醋也可以代替.有些食譜會加酸性的塔
塔粉,也是同樣的道理.

2.
戚風蛋糕的特色就是鬆軟不油膩
如果烤出來不鬆
就是蛋白霜沒有打到尾端挺立有光澤的程度
只要蛋白霜確實打好
攪拌也不容易消泡
攪拌完成的麵糊不會水水的
而是非常有體積幾乎不流動的狀態

3.
雞蛋最好用冰的,雖然要花比較多一點時間,但是打出來的蛋白霜
泡沫較穩定也比較不容易消泡.
打發的時候打蛋器舀起測試尾端挺立的時候要多舀一點蛋白霜
才會比較準
舀的量少比較看不出蛋白霜是否真的已經打到挺立
有時候舀的少感覺已經好了
但是多舀一點就發現其實尾巴是彎曲的

4.
溫的蛋白比較適合打糖份多的配方
如果糖少的配方carol習慣用冰的蛋白
打發的蛋白霜比較細緻也不容易消泡.


5.
打過頭的蛋白霜會變成綿花狀失去彈性,
呈現分離狀態.這樣做出來的成品會失敗.


6.打蛋白霜的時候中間不要停頓,一直保持高速狀態才會打出漂亮
   堅挺的蛋白霜.所中間有停頓或是使用低速,打出來的泡沫會沒有
   光澤也容易消泡.

Tuesday, July 15, 2014

Chocolate Cake Glaze Recipe


Chocolate Cake Glaze Recipe
Serves 4
               
Ingredients:

·         3/4 cup semisweet chocolate chips
·         3 tablespoons butter
·         1 tablespoon light corn syrup
·         1/4 teaspoon vanilla extract


Directions:

In a double boiler over hot, but not boiling water, combine chocolate chips, butter, and corn syrup. Stir until chips are melted and mixture is smooth, then add vanilla. Spread warm glaze over top of cake, letting it drizzle down the sides.


Thursday, July 10, 2014

good website to learn everything

http://www.wilton.com/decorating/decorating-techniques/?i=1;page=5;q1=Learn;q2=Decorating+Techniques;q3=Fondant%2FGum+Paste;x1=tab.cat1;x2=tab.cat2;x3=stab.subj1


http://www.wilton.com/cupcakes/decorating-cupcakes/

how to make doraemon with sugarpaste

1. Roll 4 different shaped balls - one should be bigger for the head, followed by a medium sized for the tummy and 2 small balls for the hand (note: i added wilton's royal blue to achieve this colour)

how to make fondant doraemon

2. Then, roll two balls of white paste - this is to form the legs. We should always start from the leg

how to make fondant doraemon

3. Place the white balls on to a foam and flatten them slightly
how to make fondant doraemon

4. On the tummy, using some white paste, roll them into the shape of a ball and flatten it to achieve the below. Else, you can also cut out a round shape from the white fondant.
how to make fondant doraemon

5. Now that the tummy is done, stick the two feet onto its tummy. You can use either water to be the gum, or u can add some water to CMC to create very good sugarpaste gum! Water usually works fine for me
how to make fondant doraemon

6. Using a black edible pen, draw a pocket on doraemon's tummy. Best to leave it till it is dry before you draw ( i was in a hurry - hence the uneven-ness)
how to make fondant doraemon

7. Next, let's add a chain and bell to doraemon! Roll out a small piece of red paste into a long sausage and stick it to doraemon's tummy. Then, roll a ball of yellow paste, using a toothpick, pierce a hole in the middle to create a more bell looking shape. Now, leave the body to dry...
how to make fondant doraemon

8. For the hands, roll out two balls of blue paste. And them roll them out to create the below. One end should be smaller than the other. At the bigger end, flatten them.
how to make fondant doraemon

9. Then glue them on to the body like the picture. Don't worry if it looks ugly now :P Also, add in a spaghetti stick right in the middle of the body to hold the head later.
how to make fondant doraemon

10. For the face, do the same thing. Either roll out some white paste into a ball and flatten them or use a round shape cutter to get a round. Paste them onto the head. Remember to leave space for its eyes.
how to make fondant doraemon

11. Using the smaller side of the ball tool, create an indentation for the eye. Roll out two small balls of white paste.
how to make fondant doraemon

12. Stick them into the hole which you've made and voila!
how to make fondant doraemon

13. For the eyes, roll two balls of black paste and paste them on. Use the ball tool to flatten the ball out nicely. Also roll a ball of red paste to create doraemon's red nose.
how to make fondant doraemon

14. Using black edible pen again, draw its whiskers! Again, it's advisable to wait till it dries. Else u will get not-so-nice whiskers like what i did. For its mouth, using red paste, roll it out and using a small round cutter, cut a thin round shape. Cut this into half to create the mouth.
how to make fondant doraemon

15. Finally, stick the head onto the body - right in the middle of the spaghetti stick. Make sure it's centralized because the head is bigger than the body. To finish it up, add 2 balls to its hand!
how to make fondant doraemon

Hope this helps! feel free to email me for more instructions to this if needed! :)
this is made specially for soo chin from mcdc :)

Sunday, July 6, 2014

decorating tips and their uses

cake decorating tips and their uses

bakery frosting tips


Bakery Frosting Recipe
Bakery Frosting Recipe photo by Taste of Home

Bakery Frosting Recipe

TOTAL TIME: Prep/Total Time: 10 min.
MAKES: 24 servings

Ingredients

  • 2 cups shortening
  • 1/2 cup powdered nondairy creamer
  • 1 teaspoon almond extract
  • 1 package (32 ounces) confectioners' sugar
  • 1/2 to 3/4 cup water
  • Food coloring, optional
 Please enter valid US ZIP code   Change Zip

Nutritional Facts

1/3 cup equals 305 calories, 17 g fat (5 g saturated fat), 0 cholesterol, trace sodium, 39 g carbohydrate, 0 fiber, 0 protein.

Directions

  1. In a large bowl, beat the shortening, creamer and extract until smooth. Gradually beat in confectioners' sugar. Add enough water to reach desired consistency. If desired, add food coloring.
  2. Store in the refrigerator for up to 3 months. Bring to room temperature before spreading. Yield: 8 cups.


tips to make cake number 0-9

Want to bring something special to the traditional cake? Food Editor Darlene has a number of great ideas for you to try.
You'll need 2 x 453g tub Betty Crocker Creamy Deluxe Vanilla Frosting. 

Serves
 10
Decorating time
 30 min

1. Arrange the cakes on the board, trimming cakes and assembling to connect and make the number shape you desire.

2. Using your choice of decorations, spread with frosting and decorate as desired.

Your choice of decorating ideas:
  • Under the sea Add blue food colouring to frosting, swirling colour through for varying intensity. Decorations like pre-made sea creatures decorations, sour strap, and fish and crocodile sweets.
  • Butterfly garden Tint frosting in orange and decorate with pre-made butterfly decorations
  • Farmyard friends Tint frosting in leaf green and use pre-made farm animal decorations
  • Off and racing Tint frosting beige and use chocolate bars to make a racetrack, decorate with novelty cars and signs.
  • What a zoo Use white frosting and decorate with animals and tinted coconut.
  • Chocolate fantasy Spread with white frosting and top with pieces of chocolate or novelty shaped chocolates.


YOUR NUMBER'S UP
If you wish to make your own cake, her are the alternatives to making the shapes used for the numbers.

Store bought cake
  • Swiss roll
  • Double layer sponge cake
  • Double layer slab cake
make your own
Make your own (Cake mix required : Baking temperature and time)
Swiss roll
Bar tin
1 x 340g buttercake cake mix-divided into two bar tins : 180C (160C FF) for 25-30 min.

Double layer sponge cake
2 shallow 18cm or 20cm cake pan
1 x 340g golden buttercake mix : 160C (140C FF) 40-45 min

Double layer slab cake
25 x 35cm shallow oblong pan
2 x 340g golden buttercake mix : 160C (140C FF) 25-30 min
One
1
1. You will need two purchase two Swiss roll style cakes for number one.

2. Place on cake onto the board. Cut a 6cm piece from the remaining cake to make the post longer. Cut a second slice and cut in half to make the base. Trim a wedge off cake for the top and position in place.

Two
2
1. You will need to purchase a double layer sponge slab for number two and make a template for the number.

2. Place the template on the cake and trim around the edges, discarding the portions of cake that are not required.

Three3
1. You will need to purchase a double layer sponge cake for number three.

2. Take each layer of the cake and remove an 8cm circle from the middle. Remove about a 1/4 of one cake for the base of the three and about 1/3 of the remaining cake for the top. Position to make the number, trimming as required.

Four
4
1. You will need to purchase a double layer sponge slab for number four.

2. Cut the slabs in half lengthways. Position the four pieces into the number four using the pic as a guide.

Five
5
1. You will need to purchase a double layer sponge slab for number five and make a template for the number.

2. Place the template on the cake and trim around the edges, discarding the portions of cake that are not required.

Six
6
1. You will need to purchase a double layer sponge cake for number six.

2. Take one layer of the cake and remove a 6m circle from the middle. Cut a piece about 6cm wide to make the top part of the number.

Seven
7
1. You will need two purchase two Swiss roll style cakes for number seven.

2. Arrange the cakes on the board, trimming wedges from each roll and assembling to connect and make the seven shape.

Eight
8
1. You will need to purchase a double layer sponge cake for number eight.

2. Cut a 6cm circle form each cake. Then trim about 2cm from the side of each cake. Push the cut edges together to make the number eight.

Nine
9
1. You will need to purchase a double layer sponge cake for number nine.

2. Take one layer of the cake and remove a 6m circle from the middle. Cut a piece about 6cm wide to make the base of the number nine. Assemble as the pic indicates.

Zero
0
1. You will need to purchase a double layer sponge cake for 0.

2. Take one layer of the cake and remove an 8cm circle from the middle. Place onto the board. Cut two 6cm squares from the remaining cake and place between the two semi-circles to make the elongated shape.